SSH aktif etmek
http://askubuntu.com/questions/15433/unable-to-lock-the-administration-directory-var-lib-dpkg-is-another-process
SSH aktiflemek için open ssh kuruyoruz
sudo apt-get install openssh-server
sudo cp /etc/ssh/sshd_config /etc/ssh/sshd_config.factory-defaults
sudo chmod a-w /etc/ssh/sshd_config.factory-defaults
sudo gedit /etc/ssh/sshd_config

banner duzeltmek
#Banner /etc/issue.net  configde ac
sonra
sudo gedit /etc/issue.net  mesaji yazınız..
sudo /etc/init.d/ssh restart

servis yeniden baslatilinca banner aktif olur
Editor ile #PasswordAuthentication yes
bulup sifre girişi aktifliyoruz. sistemdeki ubuntu user lar ile login olabilirsiniz.
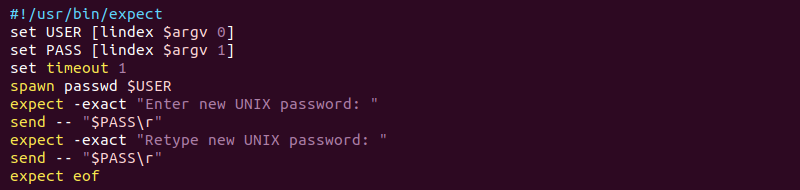
FTP sunucusunu aktif etmek
NODE JS kurulumu ve aktif etmek
https://nodejs.org/download/
indir paketi
sudo apt-get update
sudo apt-get install git build-essential wget
wget http://nodejs.org/dist/v0.8.18/node-v0.8.18.tar.gz
son surumu download sayfasından alalım
tar xvf node-v0.8.18.tar.gz
pushd node-v0.8.18
./configure
make
sudo make install
node --version
node
dermele işlemi uzun surecek
https://coolaj86.com/articles/how-to-install-nodejs-on-ubuntu.html
https://www.digitalocean.com/community/tutorials/how-to-install-node-js-on-an-ubuntu-14-04-server
https://www.digitalocean.com/community/tutorials/how-to-install-node-js-on-an-ubuntu-14-04-server
apt-get install curl
curl -sL https://deb.nodesource.com/setup | sudo bash -
sudo apt-get update
sudo apt-get install nodejs
sudo apt-get install npm
sudo apt-get install build-essential
sudo apt-get install build-essential libssl-dev
Daha detay için
Introduction
Node.js is a Javascript platform for server-side programming that allows users to build network applications quickly. By leveraging Javascript on both the front-end and the back-end, development can be more consistent and be designed within the same system.
In this guide, we’ll show you how to get started with Node.js on an Ubuntu 14.04 server.
If you are looking to set up a production Node.js environment, check out this link: How To Set Up a Node.js Application for Production.
How To Install the Distro-Stable Version
Ubuntu 14.04 contains a version of Node.js in its default repositories that can be used to easily provide a consistent experience across multiple servers. The version in the repositories is 0.10.25. This will not be the latest version, but it should be quite stable.
In order to get this version, we just have to use the apt package manager. We should refresh our local package index prior and then install from the repositories:
sudo apt-get update
sudo apt-get install nodejs
If the package in the repositories suits your needs, this is all that you need to do to get set up with Node.js. In most cases, you’ll also want to also install npm, which is the Node.js package manager. You can do this by typing:
sudo apt-get install npm
This will allow you to easily install modules and packages to use with Node.js.
Because of a conflict with another package, the executable from the Ubuntu repositories is called nodejsinstead of node. Keep this in mind as you are running software.
Below, we’ll discuss some more flexible methods of installation.
How To Install Using a PPA
An alternative that can get you a more recent version of Node.js is to add a PPA (personal package archive) maintained by NodeSource. This will probably have more up-to-date versions of Node.js than the official Ubuntu repositories.
First, you need to install the PPA in order to get access to its contents:
curl -sL https://deb.nodesource.com/setup | sudo bash -
The PPA will be added to your configuration and your local package cache will be updated automatically. After running the setup script from nodesource, you can install the Node.js package in the same way that you did above:
sudo apt-get install nodejs
The nodejs package contains the nodejs binary as well as npm, so you don’t need to install npmseparately. However, in order for some npm packages to work (such as those that require building from source), you will need to install the build-essentials package:
sudo apt-get install build-essential
How To Install Using NVM
An alternative to installing Node.js through apt is to use a specially designed tool called nvm, which stands for “Node.js version manager”.
Using nvm, you can install multiple, self-contained versions of Node.js which will allow you to control your environment easier. It will give you on-demand access to the newest versions of Node.js, but will also allow you to target previous releases that your app may depend on.
To start off, we’ll need to get the software packages from our Ubuntu repositories that will allow us to build source packages. The nvm script will leverage these tools to build the necessary components:
sudo apt-get update
sudo apt-get install build-essential libssl-dev
Once the prerequisite packages are installed, you can pull down the nvm installation script from theproject’s GitHub page. The version number may be different, but in general, you can download and install it with the following syntax:
curl https://raw.githubusercontent.com/creationix/nvm/v0.16.1/install.sh | sh
This will download the script and run it. It will install the software into a subdirectory of your home directory at ~/.nvm. It will also add the necessary lines to your ~/.profile file to use the file.
To gain access to the nvm functionality, you’ll need to log out and log back in again, or you can source the~/.profile file so that your current session knows about the changes:
source ~/.profile
Now that you have nvm installed, you can install isolated Node.js versions.
To find out the versions of Node.js that are available for installation, you can type:
nvm ls-remote
. . .
 v0.11.6
 v0.11.7
 v0.11.8
 v0.11.9
v0.11.10
v0.11.11
v0.11.12
v0.11.13
As you can see, the newest version at the time of this writing is v0.11.13. You can install that by typing:
nvm install 0.11.13
Usually, nvm will switch to use the most recently installed version. You can explicitly tell nvm to use the version we just downloaded by typing:
nvm use 0.11.13
When you install Node.js using nvm, the executable is called node. You can see the version currently being used by the shell by typing:
node -v
v.0.11.13
If you have multiple Node.js versions, you can see what is installed by typing:
nvm ls
If you wish to default one of the versions, you can type:
nvm alias default 0.11.13
This version will be automatically selected when a new session spawns. You can also reference it by the alias like this:
nvm use default
Each version of Node.js will keep track of its own packages and has npm available to manage these.
You can have npm install packages to the Node.js project’s ./node_modules directory by using the normal format:
npm install express
If you’d like to install it globally (available to the other projects using the same Node.js version), you can add the -g flag:
npm install -g express
This will install the package in:
~/.nvm/node_version/lib/node_modules/package_name
Installing globally will let you run the commands from the command line, but you’ll have to use link the package into your local sphere to require it from within a program:
npm link express
You can learn more about the options available to you with nvm by typing:
nvm help
Conclusion
As you can see, there are a quite a few ways to get up and running with Node.js on your Ubuntu 14.04 server. Your circumstances will dictate which of the above methods is the best idea for your circumstance. While the packaged version in Ubuntu’s repository is the easiest, the nvm method is definitely much more flexible.
VNC SERVER Installation
https://www.howtoforge.com/how-to-install-vnc-server-on-ubuntu-14.04
apt-get install vnc4server
sonra vnc4server çalıştırıp 6 karkaterlik şifre veriyoruz
Back Up almak terminalden
http://www.upubuntu.com/2012/03/how-to-make-full-system-backup-using.html
Ek bilgiler
Terminal de lock kaldırmak :
sudo rm /var/lib/apt/lists/lock

donanım bilgilerini ğrenmek
 lspci -nnk | grep VGA -A1

dmesg   bu koutla donanım bilgisini ogrenin
lsusb   usb cihazları goruntuler listeler
SSH client windows Putty de renk değiştirmek
https://www.youtube.com/watch?v=61kBH6lAuv4
manuel ip static ayarlamak
https://www.thefanclub.co.za/how-to/how-add-wireless-lan-adaptor-static-ip-ubuntu-auto-connects-startup

Usbserial driver kurulumu
http://www.at91.com/linux4sam/bin/view/Linux4SAM/SoftwareTools

[ 8148.843134] usb 4-2: Manufacturer: Microchip Technology Inc.
[ 8148.846290] cdc_acm 4-2:1.0: ttyACM0: USB ACM device
[ 8378.832160] usb 4-2: USB disconnect, device number 7
[ 8416.796062] usb 4-2: new full-speed USB device number 8 using uhci_hcd
[ 8416.987112] usb 4-2: New USB device found, idVendor=04d8, idProduct=000a
[ 8416.987120] usb 4-2: New USB device strings: Mfr=1, Product=2, SerialNumber=0
[ 8416.987127] usb 4-2: Product: CDC RS-232 Emulation Demo
[ 8416.987132] usb 4-2: Manufacturer: Microchip Technology Inc.
[ 8416.989288] cdc_acm 4-2:1.0: ttyACM0: USB ACM device


rmmod usbserial
lsusb -d 04d8:000a

modprobe usbserial vendor=0x04d8 product=0x000a

dmesg
hyper terminal uygulamasi
sudo apt-get install gtkterm

nodejs
var SerialPort = require("serialport").SerialPort
var port = "/dev/ttyACM0";
VN:F [1.9.22_1171]
Rating: 0.0/10 (0 votes cast)
VN:F [1.9.22_1171]
Ağu 22 2015
ubuntu server kurulum notlarım
SSH aktif etmek
http://askubuntu.com/questions/15433/unable-to-lock-the-administration-directory-var-lib-dpkg-is-another-process
SSH aktiflemek için open ssh kuruyoruz
Editor ile #PasswordAuthentication yes
bulup sifre girişi aktifliyoruz. sistemdeki ubuntu user lar ile login olabilirsiniz.
FTP sunucusunu aktif etmek
NODE JS kurulumu ve aktif etmek
https://nodejs.org/download/
indir paketi
dermele işlemi uzun surecek
https://coolaj86.com/articles/how-to-install-nodejs-on-ubuntu.html
https://www.digitalocean.com/community/tutorials/how-to-install-node-js-on-an-ubuntu-14-04-server
https://www.digitalocean.com/community/tutorials/how-to-install-node-js-on-an-ubuntu-14-04-server
VNC SERVER Installation
https://www.howtoforge.com/how-to-install-vnc-server-on-ubuntu-14.04
apt-get install vnc4server
sonra vnc4server çalıştırıp 6 karkaterlik şifre veriyoruz
Back Up almak terminalden
http://www.upubuntu.com/2012/03/how-to-make-full-system-backup-using.html
Ek bilgiler
Terminal de lock kaldırmak :
sudo apt-get install gtkterm nodejs var SerialPort = require("serialport").SerialPort var port = "/dev/ttyACM0";By Burhan KARADERE • 2015 - 2016, Ubuntu, Ubuntu • 0 • Tags: notlarım, server, Ubuntu